Description
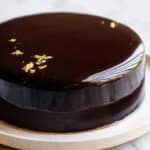
This elegant Chocolate Mirror Glaze cake features a smooth, glossy ganache-covered chocolate cake topped with a luxurious, shiny mirror glaze. The two-layer chocolate cake is frosted with dark chocolate ganache, then coated in a silky mirror glaze made from cocoa, cream, sugar, and gelatine, creating a stunning finish perfect for special occasions.
Ingredients
Scale
Cake and Ganache
- 1 x 20cm / 8″ chocolate cake (2 layers)
- 2 batches Dark Chocolate Ganache
Mirror Glaze
- 2 1/2 tbsp water (cold tap water)
- 4 tsp gelatine powder
- 2/3 cup water
- 2/3 cup cream (pure/regular whipping cream, better than thickened/heavy cream)
- 1 cup cocoa powder (unsweetened, sifted, preferably Dutch processed)
- 1 cup + 2 tbsp white sugar (caster/superfine)
- Gold dust and gold leaf (optional decorations)
Instructions
- Prepare Cake and Ganache Frosting: Refrigerate the cake layers for at least 1 hour until well chilled for easier handling. Trim the cake layers to make them level, then frost the cake evenly with dark chocolate ganache, smoothing it out to create a flat, uniform surface. Refer to the tutorial for frosting cakes smoothly for best results.
- Chill Frosted Cake: After frosting with ganache, refrigerate the cake for at least 1 hour to set the frosting firmly before applying the mirror glaze.
- Bloom Gelatine: Place 2 1/2 tablespoons cold water in a small bowl. Sprinkle the gelatine powder evenly over the water surface and gently mix so all powder is wet. Let it rest for 5 minutes until it becomes rubbery, a process called blooming gelatine.
- Mix Cocoa and Water: In a medium saucepan, combine cocoa powder and 2/3 cup water. Stir thoroughly until the mixture forms a smooth, lump-free paste.
- Add Cream and Sugar: Add a small amount of the cream to the cocoa paste to loosen it, then add the remaining cream and the white sugar. Gently stir to combine without vigorous mixing or using a whisk, which could introduce bubbles.
- Heat the Glaze: Turn the stove to medium-high heat and gently bring the mixture to a boil. Remove immediately once boiling.
- Dissolve Gelatine: Add the bloomed gelatine lump into the hot glaze and gently stir until it dissolves completely resulting in a glossy, smooth glaze. Some white foam may appear, which is normal.
- Strain the Glaze (First Strain): Using a small fine mesh strainer set over a shallow bowl, strain the glaze carefully to avoid bubbles by minimizing the falling distance of the liquid.
- Remove Bubbles: Hold the bowl and twist rapidly side to side to bring any bubbles to the surface. If bubbles persist, follow the bubble troubleshooting tips outlined in the notes.
- Cool Glaze: Cover the surface with cling wrap pressed directly onto the glaze to prevent skin formation. Allow the glaze to cool at room temperature for about 2 hours until it reaches 30°C (86°F). Overnight refrigeration is also possible as noted.
- Strain Glaze Again Before Use: Just before glazing, strain the cooled glaze into a jug to ensure smoothness, again minimizing the distance the liquid falls to reduce bubbles.
- Prepare Cake for Glazing: Remove the cake from the fridge and place it on a rack set over a tray to catch excess glaze drips.
- Apply Mirror Glaze: Starting from the center of the cake, pour the glaze in a steady, expanding spiral motion outward to cover the entire surface and sides. Pour confidently in a thick stream for a smooth, curtain-like effect, avoiding drips from slow drizzle.
- Cover Any Bare Patches: Quickly pour glaze on any uncovered spots on the cake’s sides immediately after initial pouring.
- Transfer Cake to Platter: Before the glaze sets (approximately 10 minutes), move the cake carefully from the rack to the serving platter.
- Fix Imperfections: Use leftover glaze to fill any tears or gaps in the coating, smoothing them out with a warmed palette knife gently heated by blow torch or warm water.
- Slice Cake Cleanly: Fill a tall jug with warm water, dip a clean knife, wipe dry, and make a single slice. Repeat dipping, drying, and slicing each wedge to achieve neat, clean layers without tearing.
Notes
- Note 1: The cake base should be a firm chocolate cake baked in two 8″ layers, cooled completely before frosting.
- Note 2: Dark chocolate ganache is prepared separately using good quality dark chocolate and cream. Refer to a reliable ganache recipe to ensure consistency appropriate for frosting.
- Note 3: Use powdered gelatin that blooms effectively in cold water for a shiny, stable glaze.
- Note 4: Use pure whipping cream for best texture; thickened/heavy cream won’t yield the best smoothness.
- Note 5: Dutch processed cocoa powder is preferred because it gives a smoother flavor and better color for the glaze.
- Note 6: Use caster or superfine white sugar for quick and complete dissolving without graininess.
- Note 7: Avoid whisking the glaze vigorously to prevent air bubbles that spoil the glossy finish.
- Note 8: Bubble troubleshoot by gently shaking the bowl as described and avoiding pouring glaze from a height; use fine mesh strainers and minimal pour distance.
- Note 9: Overnight refrigeration of glaze is possible but bring to room temperature before applying. Also, shift the cake carefully from rack to platter to avoid glaze damage by sliding the platter under the rack smoothly.
- Prep Time: 1 hour 20 minutes
- Cook Time: 15 minutes
- Category: Dessert
- Method: Stovetop
- Cuisine: International
Keywords: Chocolate cake, mirror glaze, chocolate ganache, party cake, glossy cake glaze, dessert decoration