
Cheesy Garlic Breadsticks Recipe
Introduction
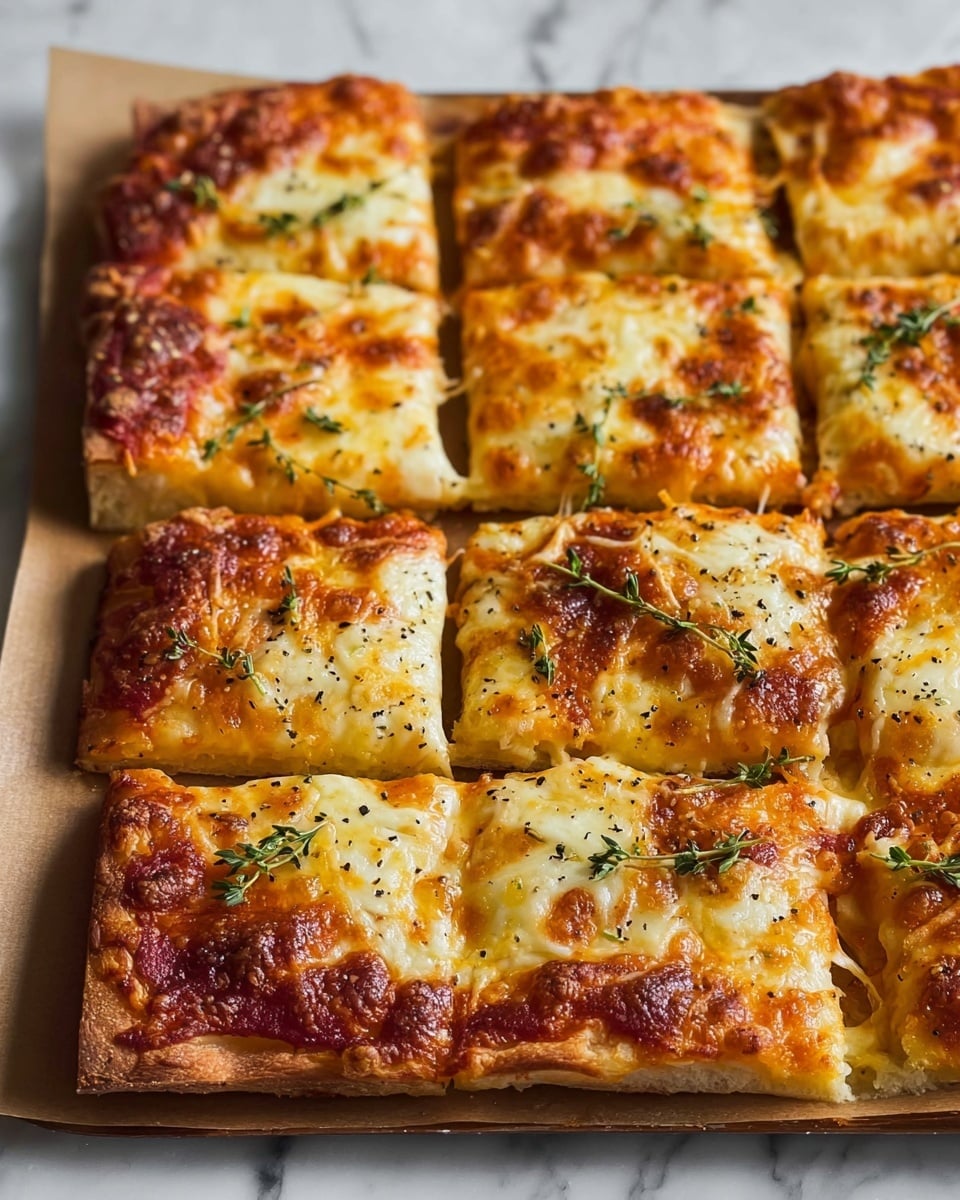
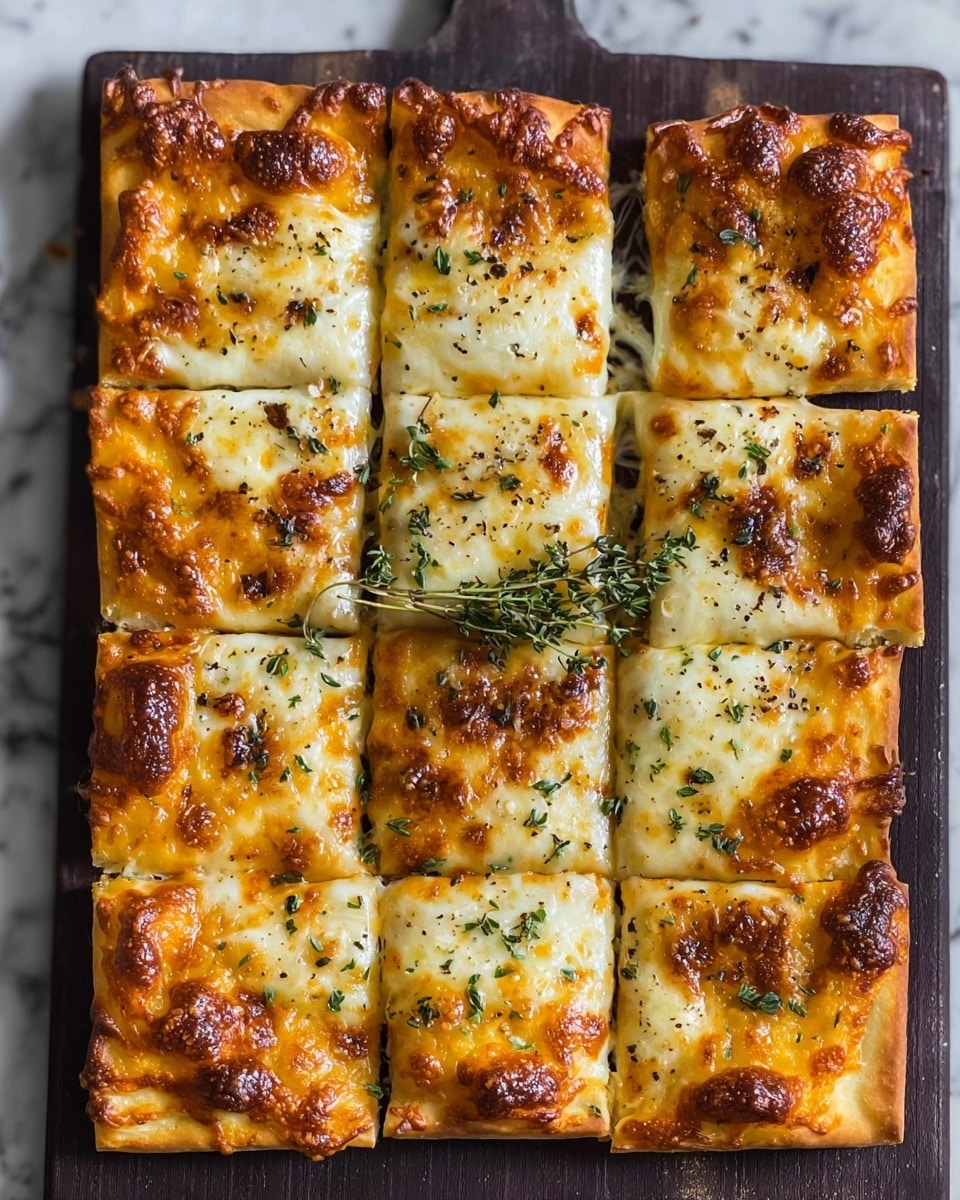
Cheesy Garlic Breadsticks are a crowd-pleasing snack or side that combines soft, warm dough with rich garlic butter and melted cheese. Perfect for game days, family dinners, or anytime you want a comforting treat that’s easy to make at home.
Ingredients
- 1 pound pizza dough (store-bought or homemade)
- 1/2 cup (1 stick) unsalted butter, melted
- 4 cloves garlic, minced
- 1 teaspoon dried Italian seasoning
- 1/2 teaspoon garlic powder
- 1/4 teaspoon salt
- 1/4 teaspoon black pepper
- 1 1/2 cups shredded mozzarella cheese
- 1/2 cup grated Parmesan cheese
- Optional: Fresh parsley, chopped, for garnish
- Optional: Marinara sauce, for dipping
Instructions
- Step 1: Prepare the garlic butter by melting the butter in a small microwave-safe bowl in 30-second intervals or in a small saucepan over low heat on the stovetop.
- Step 2: Stir the minced garlic, dried Italian seasoning, garlic powder, salt, and black pepper into the melted butter. Let the mixture sit for 5-10 minutes to allow the flavors to meld.
- Step 3: Preheat your oven to 400°F (200°C) and line a large baking sheet with parchment paper.
- Step 4: On a lightly floured surface, stretch or roll out the pizza dough into a 12×16 inch rectangle about 1/4 inch thick.
- Step 5: Cut the dough into strips about 1 inch wide and 6-8 inches long.
- Step 6: Arrange the breadstick strips on the prepared baking sheet, leaving a little space between each.
- Step 7: Brush the garlic butter mixture generously over all the breadsticks.
- Step 8: Evenly sprinkle the shredded mozzarella and grated Parmesan cheeses over the breadsticks.
- Step 9: Bake in the preheated oven for 12-15 minutes, until the breadsticks are golden and the cheese is melted and bubbly.
- Step 10: Remove from the oven and allow the breadsticks to cool on the baking sheet for a few minutes.
- Step 11: Garnish with chopped fresh parsley if desired, and serve warm with marinara sauce for dipping.
Tips & Variations
- For extra flavor, sprinkle some red pepper flakes over the breadsticks before baking for a mild kick.
- Use fresh herbs like oregano or basil instead of dried Italian seasoning for a fresher taste.
- Try swapping mozzarella for provolone or cheddar cheese to change up the flavor profile.
- Make these gluten-free by using a gluten-free pizza dough available at many stores.
Storage
Store leftover breadsticks in an airtight container at room temperature for up to 2 days. For longer storage, refrigerate for up to 4 days and reheat in the oven at 350°F until warmed through to keep them crisp. Avoid microwaving if possible to prevent sogginess.
How to Serve
Serve this delicious recipe with your favorite sides.
FAQs
Can I make the garlic butter mixture ahead of time?
Yes, you can prepare the garlic butter up to a day in advance and refrigerate it. Warm it gently before brushing on the dough to make it easier to spread.
Can I freeze these breadsticks?
Yes, bake the breadsticks first, then let them cool completely. Wrap them tightly and freeze for up to 2 months. Reheat in the oven from frozen for best texture.
Print
Cheesy Garlic Breadsticks Recipe
- Total Time: 30 minutes
- Yield: 12 breadsticks 1x
Description
Deliciously soft and cheesy garlic breadsticks baked to perfection, featuring a blend of mozzarella and Parmesan cheeses infused with flavorful garlic butter and Italian seasoning. Perfect as a snack or a side with your favorite meal, these breadsticks are easy to make using either store-bought or homemade pizza dough and baked in a conventional oven until golden and bubbly.
Ingredients
Dough
- 1 pound pizza dough (store-bought or homemade)
Garlic Butter Mixture
- 1/2 cup (1 stick) unsalted butter, melted
- 4 cloves garlic, minced
- 1 teaspoon dried Italian seasoning
- 1/2 teaspoon garlic powder
- 1/4 teaspoon salt
- 1/4 teaspoon black pepper
Cheeses
- 1 1/2 cups shredded mozzarella cheese
- 1/2 cup grated Parmesan cheese
Optional Garnishes
- Fresh parsley, chopped, for garnish
- Marinara sauce, for dipping
Instructions
- Prepare Garlic Butter: In a small microwave-safe bowl, melt the butter using 30-second intervals in the microwave or melt it gently in a small saucepan over low heat on the stovetop.
- Mix Flavors: Add minced garlic, dried Italian seasoning, garlic powder, salt, and black pepper to the melted butter and stir well to combine all the flavors evenly.
- Let It Rest: Allow the garlic butter mixture to sit for 5 to 10 minutes to enable the flavors to meld together, enhancing the taste.
- Preheat Oven: Set your oven to 400°F (200°C) and line a large baking sheet with parchment paper for easy cleanup and to prevent sticking.
- Prepare Dough: On a lightly floured surface, roll or stretch the pizza dough into a rectangle approximately 12 by 16 inches, with a thickness of about 1/4 inch.
- Cut Breadsticks: Slice the dough into strips about 1 inch wide and 6 to 8 inches long, ensuring uniform sizes for even baking.
- Arrange on Baking Sheet: Place the strips on the parchment-lined baking sheet, leaving a little space between each to allow for slight expansion while baking.
- Brush with Garlic Butter: Generously brush the prepared garlic butter mixture over each breadstick to infuse rich flavor and buttery goodness.
- Add Cheeses: Evenly sprinkle shredded mozzarella and grated Parmesan over the butter-coated dough strips for a cheesy topping.
- Bake: Bake the breadsticks in the preheated oven for 12 to 15 minutes or until they turn golden brown and the cheese melts and bubbles enticingly.
- Cool Slightly: Remove the breadsticks from the oven and let them cool on the baking sheet for a few minutes to firm up for easier handling.
- Garnish: Optionally sprinkle chopped fresh parsley over the warm breadsticks to add a fresh, vibrant touch and color.
- Serve: Serve the cheesy garlic breadsticks warm, optionally paired with marinara sauce for dipping to enhance the flavor experience.
Notes
- You can substitute pizza dough with breadstick dough or any yeast dough if preferred.
- Adjust garlic quantity according to your taste preference for stronger or milder garlic flavor.
- Ensure the dough is not too thick to aid in faster, even baking and a crispier crust.
- For extra crispiness, broil the breadsticks for 1-2 minutes at the end, watching carefully to prevent burning.
- Store leftovers in an airtight container at room temperature for up to 2 days and reheat in the oven for best texture retention.
- Prep Time: 15 minutes
- Cook Time: 15 minutes
- Category: Appetizer
- Method: Baking
- Cuisine: Italian
Keywords: Cheesy garlic breadsticks, garlic breadsticks recipe, cheesy breadsticks, homemade breadsticks, pizza dough breadsticks

